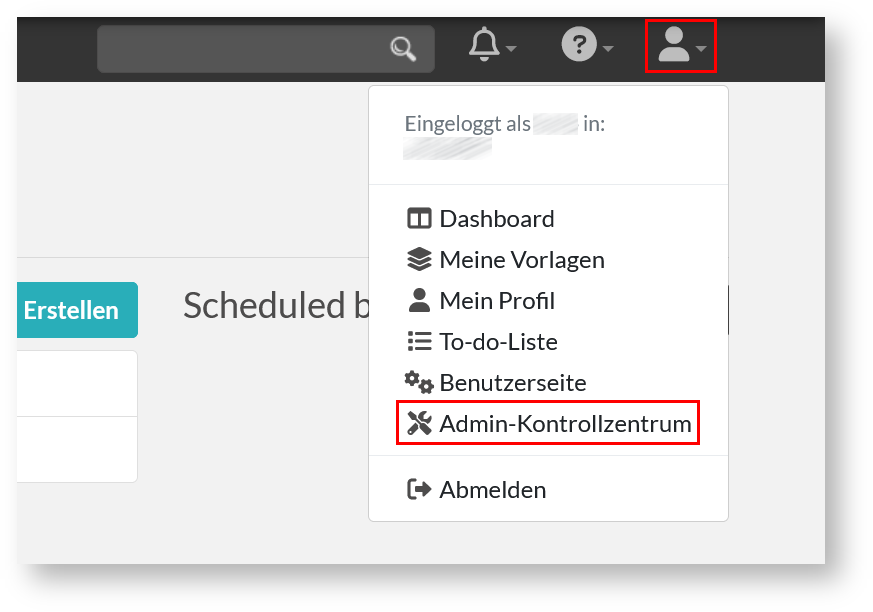
Normale User sehen in der Regel keines der „Kontrollzentren“, Team-Admins sehen in der Regel das „Sysadmin-Kontrollzentrum“ nicht. Der Button „Team Wechsel“ ist nur vorhanden, wenn man in mehreren Teams ist.
1) Click on the User menu at the top right of the page and select the Admin Control Panel.
Normal users usually do not see any of the "control centers", team admins usually do not see the "sysadmin control center". The "Team Change" button is only available if you are in multiple teams.
Nachdem das Admin-Kontrollzentrum geladen ist, sehen Sie oben auf der Seite eine Liste von Reitern. Der Reiter „Team“ ist standardmäßig ausgewählt. Klicken Sie auf den Reiter „Benutzer“.
After the Admin Control Center loads, you will see a list of tabs at the top of the page. The "Team" tab is selected by default. Click the "Users" tab.
- nach Benutzenden im Team suchen können (das ist vor allem bei großen Teams nützlich)
- durch einen Klick auf „zeige alle“, alle Personen in Ihrem Team anzeigen lassen können
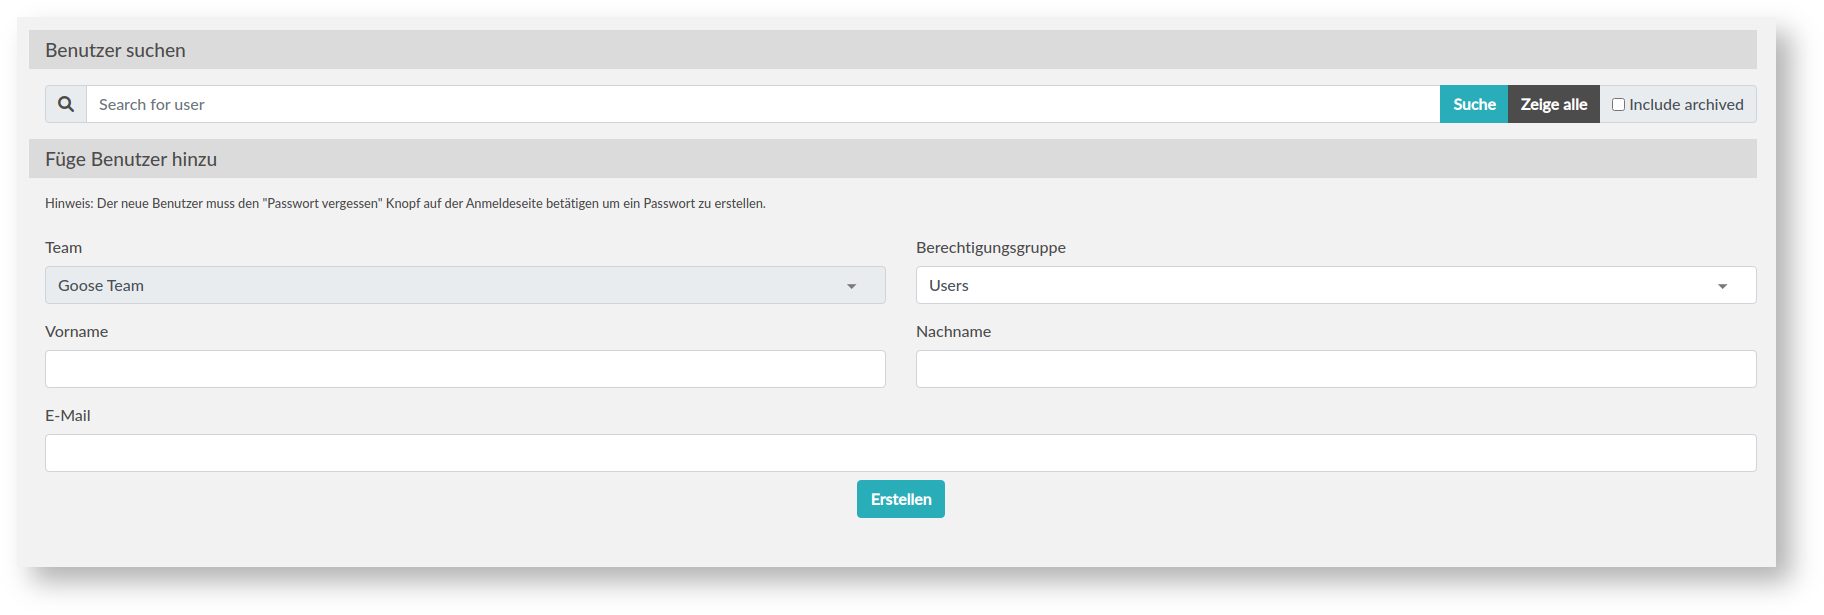
und im unteren Segment neue Personen zu Ihrem Team hinzufügen können. Tragen Sie in die Felder "Vorname" und "Nachname" die entsprechenden Informationen und in das Feld „E-Mail“ die E-Mail-Adresse der Person ein (wichtig ist, dass Sie im nächsten Schritt auch die Uni-Kennung eintragen).
Als Berechtigungsgruppe können sie wählen aus
- Users – reguläre Benutzende in Ihrem Team
- Admins – Team-Admins (dies sollten Sie nur wählen, wenn die Personen Ihr Team verwalten sollen)
Die Person, die Sie zu Ihrem Team hinzufügen, muss kein Passwort wählen.
Here you will find an area where you can search for users in the team in the upper segment "search users":
- search for users in the team (this is especially useful for large teams)
- by clicking on "show all" you can display all people in your team
and in the lower segment you can add new people to your team. Enter the appropriate information in the First Name and Last Name fields and the person's email address in the Email field (it is important to also add the university username in the next step).
As a permission group you can choose from
- Users - regular users in your team
- Admins - team admins (you should choose this only if you want them to manage your team)
The person you add to your team does not need to choose a password.
Nun suchen Sie entweder nach der Person, die sie gerade angelegt haben, oder nutzen die Option zeige alle, wenn ihr Team klein ist. Lokalisieren Sie nun die Person, die gerade angelegt wurde und tragen Sie in das Feld Interne ID die Uni-Kennung der Person ein. Dies sorgt dafür, dass sich die E-Mail-Adresse automatisch auf die Haupt-E-Mail-Adresse aktualisiert, wenn die Person sich einloggt.
Hinweis: Sie müssen dies nicht bei allen existierenden Teammitgliedern anpassen, wenn deren Logins funktionieren, dies ist bei diesen Personen nur dann nötig, wenn sich die Haupt-E-Mail-Adresse ändert.
Now search for the newly created person or use the option show all if your team is small. Locate the newly created person and enter the university username into the field internal id. This will update the e-mail-address automatically when the main e-mail address changes.
Note: You don’t have to enter the internal ID for existing users with a working login. This is only necessary if the main e-mail address of the person changes.
Die Inhalte auf dieser Seite sind verfügbar unter CC BY-NC-SA 4.0 – Attribution: ZIM HHU
Content on this page is available under CC BY-NC-SA 4.0 – Attribution: ZIM HHU


